
Importing data: ACT!
- Click on File and New. Select ACT! Database and click OK.
- Give the new database a name and click on Save.
- A “My Record Information” box will appear. If all of the information is correct, click OK. Then it will ask you if the information is complete and correct — answer appropriately.
- Click on File, select Data Exchange, and click on Import.
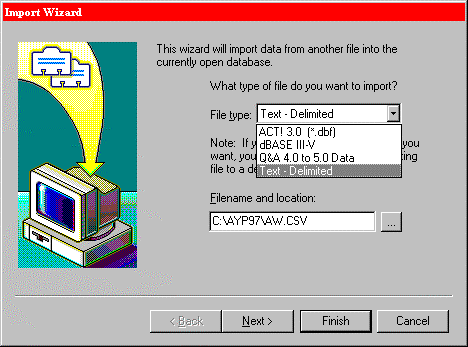
- In the File type: box, choose Text – Delimite.
- Click the browse button (the button with the three dots on it) next to the Filename and location: box.
- In the Look in… box, select the folder on your drive where your new data resides. Double-click on the file that appears in the window. Click on Next.NOTE: your file must be named with a .txt or .csv extension to be visible in this window. We send out our files with .csv extension by default.
- Make sure Contact records only is selected. Click on the Options… button and make sure there is not a check mark in the box next to Yes, import the first record. Click on OK, then Next.
- Ensure that Don’t use predefined map is checked, then click Next.
- In the Contact Map window, match up the fields from your file with the fields in ACT!. Example: to map the field Contact Name from the left side of the list, click on the right side next to Contact Name & go through the list until you see Contact, then click on it. Do this same procedure for all the fields on the left side ( if you don’t need a particular field, don’t map it; if you can’t find anything on the right side that matches your field, you can select one of fifteen User fields).

- If you want to save the map you’ve created, click on Save Map. Give the map a name & click Save. You will be able to use this map for future imports with files that have the same fields.
- Click on Finish, and the records will be imported into the database.
BACK
Still didn’t find an answer to you question? Contact us we will be glad to help